


A complete polyphonic synthesizer in a single 16HP Eurorack module.
- MIDI IN input – MIDI keyboard, other MIDI controller or computer interface.
- SELECT knob – rotate to change displayed menu setting, then click to select that setting.
- BACK button – click to go back to previous menu level.
- HOME button – click to go to top-level menu.
- L OUT, R OUT outputs – two audio signals, left and right.
- And a power switch to turn the module on or off.


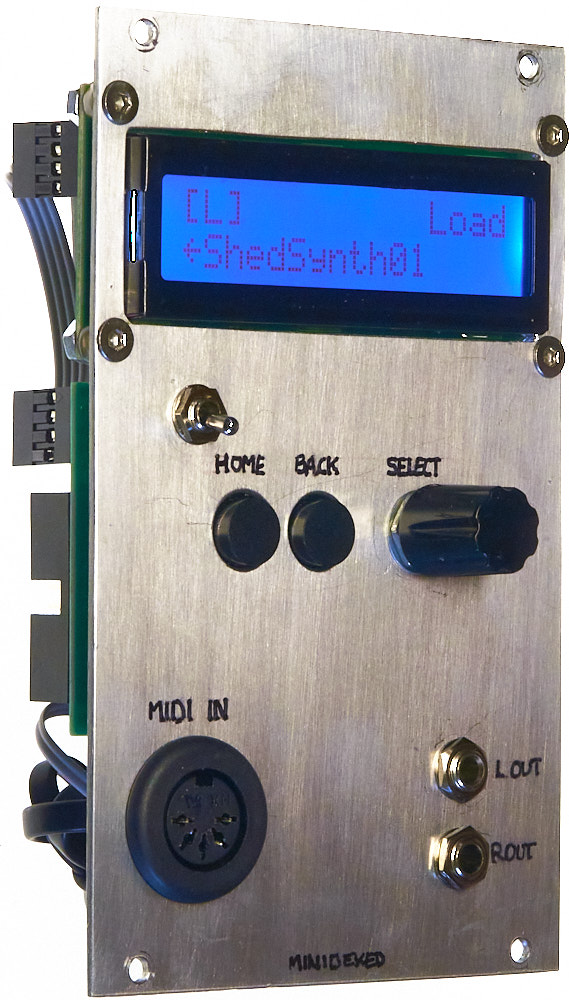
This module is a software emulation of the Yamaha DX7 FM synthesizer, with 32 preset voices (including the beautiful electric piano that infested the 1980s) and a library of “performances” combining multiple voices.
MiniDexed
MiniDexed is an open-source project at https://github.com/probonopd/MiniDexed. None of it was my work; I am grateful to all of the contributors.
Documentation at https://github.com/probonopd/MiniDexed/wiki.
Floyd Steinberg’s introduction to MiniDexed:
See also Kevin DIYElectroMusic’s “Bare Metal” Raspberry Pi MiniDexed DX7 which explains some of the construction more clearly. His MiniDexed Raspberry Pi IO Board is a neater version of this module, and the schematic helped me understand my rotary encoder.
See also Aria Salvatrice’s Akoma post, a detailed description of their own design and bug-fixing process to make something similar to this module.
Raspberry PI
MiniDexed runs on a bare metal Raspberry Pi without a Linux kernel or operating system. A massive advantage over most Raspberry Pi applications – the module can be powered off without a shutdown sequence, no data will be lost or corrupted.
On Raspberry Pi 2 and larger, MiniDexed can run 8 tone generators simultaniously. This module uses a Raspberry Pi Zero 2 W, a quad-core ARM processor on a tiny 65mm × 30mm package.
Download the software here. Unzip the files onto a MicroSD card, configure settings in the minidexed.ini files, plug the card into your Raspberry and switch on.
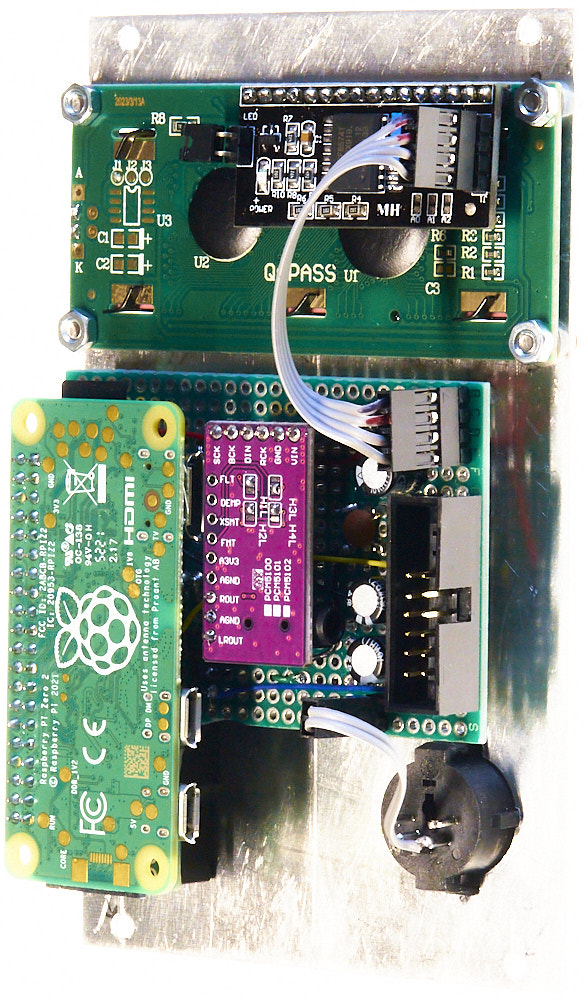
Circuit

All the connections to the Raspberry GPIO connector are described in the MiniDexed WIKI. Many components have alternative options, configured in the minidexed.ini file.
Note that all data connections operate at 3.3V. Other Arduino-based ShedSynth modules operate at 5V which would fry your Raspberry.
Note that the GPIO data pins are not numbered consecutively on the 40-pin connector: refer to this pinout.
The MIDI input uses a H11L1M optocoupler to bring the serial data safely into the GPIO15 pin. The 3.3V supply is obtained from either of the 3.3V pins shown above.
The display is a pre-built HD44780 with I2C interface into GPIO2 and GPIO3 pins, only 4 connections in total. The 5V supply is obtained from either of the 5V pins shown above.
Configure the display in the minidexed.ini file:
# HD44780 LCD
LCDEnabled=1
LCDI2CAddress=0x27
LCDColumns=16
LCDRows=2
The rotary encoder connects directly to the GPIO9, GPIO10 and GPIO11 pins. The two push buttons connect directly to the GPIO17 and GPIO27 pins. These use internal pull-ups so there is no separate connection to 3.3V.
10nF capacitors help to de-bounce the switches.
Configure the HOME and BACK switches in the minidexed.ini file (the default operation uses the rotary encoder switch for all functions):
# GPIO Button Navigation
#  Any buttons set to 0 will be ignored
ButtonPinPrev=0
ButtonActionPrev=
ButtonPinNext=0
ButtonActionNext=
ButtonPinBack=27
ButtonActionBack=click
ButtonPinSelect=11
ButtonActionSelect=click
ButtonPinHome=17
ButtonActionHome=click
ButtonPinShortcut=11
The pre-built PCM5102 DAC module (a purple one from eBay) is connected to the GPIO18, GPIO19 and GPIO21 pins. The 5V supply is obtained from either of the 5V pins shown above.
Configure the DAC in the minidexed.ini file:
# Sound device
SoundDevice=i2s
#SoundDevice=pwm
#SoundDevice=hdmi
#SampleRate=48000
#ChunkSize=256
#DACI2CAddress=0
#ChannelsSwapped=0
The DAC’s LOUT and ROUT audio outputs are buffered up to Eurorack signal levels by a dual op-amp. That is powered from the Eurorack +12V/-12V supply.
The gain set by the feedback resistors was determined by experiment – op-amp on breadboard, choose the loudest performance, hit multiple keys heavily, watch the scope for clipping. Playing normally, the outputs stay within Eurorack ±5V with occasional peaks to ±10V.
Not shown here: the op-amp is powered directly from the +12V and -12V rails, and 0.1µF capacitors should be connected between the device’s power pins and 0V.
Power
The Pi is powered from the +5V rail on a 16-way Eurorack power connector, connecting directly to one of the 5V pins on the GPIO. Note that there is no over-voltage protection when connected in this way.
The Pi draws 300mA when running MiniDexed; the much less powerful Arduino Nanos used elsewhere in ShedSynth typically draw about 20mA, less than a bright LED. An on/off switch was included, to reduce PSU load when lovely electric pianos are not needed.
During development, it was more convenient to power the Pi separately via its micro-USB connector. If attempting to do this while powering the op-amp through the power connector, ensure that the power switch remains off.
Construction
The module is built on a 7cm x 7cm piece of perfboard fitted directly behind the aluminium front panel, with a cut-out to fit one or two front-panel DIN sockets.


All components are wired point-to-point with 30 AWG kynar wire: green for data & signal, GND black, +12V yellow, -12V blue, +5V red, +3.3V yellow with red Sharpie stripe.
A 20+20 row header mates with the GPIO pins on the Raspberry Pi Zero mount to the rear of the board. Seen from the front, the GPIO pins have the same orientation as all the published GPIO pinouts.
The pre-built PCM5102 DAC module has a row of six data pins fitted, and also three pins for left/right audio output and analog ground, to mate to 6-pin and 3-pin sockets on the rear of the board next to the Pi.
The stereo 3.5mm was useful during testing, but not connected when the module is in use.

My DAC initially made no sound at all. This link explains how to configure the DAC with solder bridges.
The pre-built HD44780 display module connects to the board with a 4-way ribbon cable.
The MIDI IN DIN socket connects to the board with a 2-way ribbon cable.
Ideas & rethinks…
ShedSynth sounds have been entirely analogue until now, with a few Arduinos for control voltages and MIDI. But no apology – as soon as I got MiniDexed running on an old Pi2, voice number 11 E.Piano immediately turned my head. And then editing a performance of seven E.Pianos, slightly detuned and panned across the stereo field turned it a bit more. I’m not in love.
That first test with the Pi2 didn’t need any hardware: I configured minidexed.ini to use the headphone output and configured performance.ini to select voice 11.
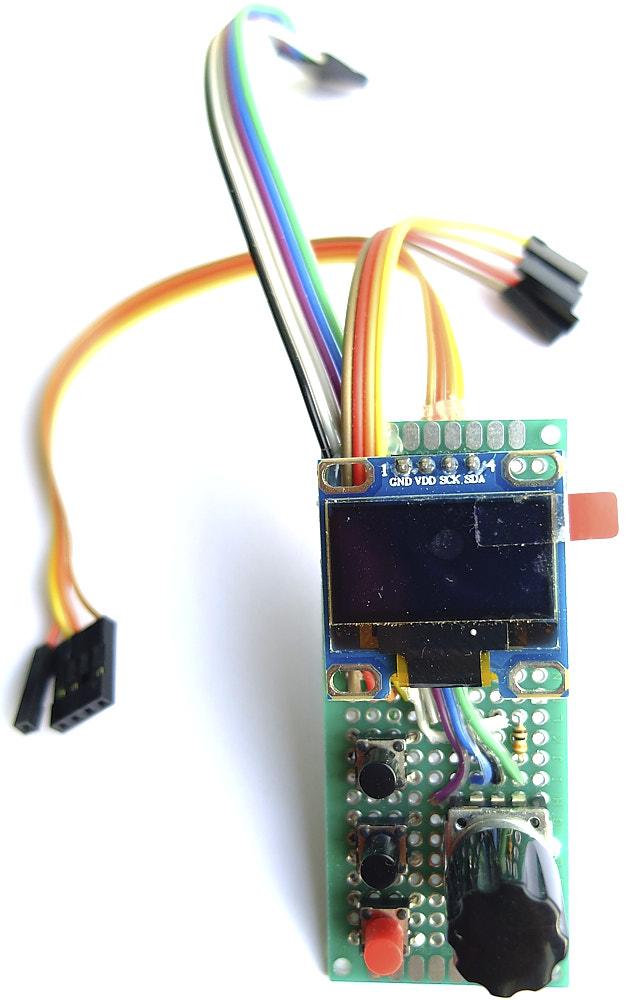
The initial plan was a much smaller 8HP module with a tiny SSD1306 OLED display. The exact same circuit can be used by altering the configuration in minidexed.ini.
An experimental test rig using Pi2, rotary encoder and SS1306 display felt too small to use comfortably.
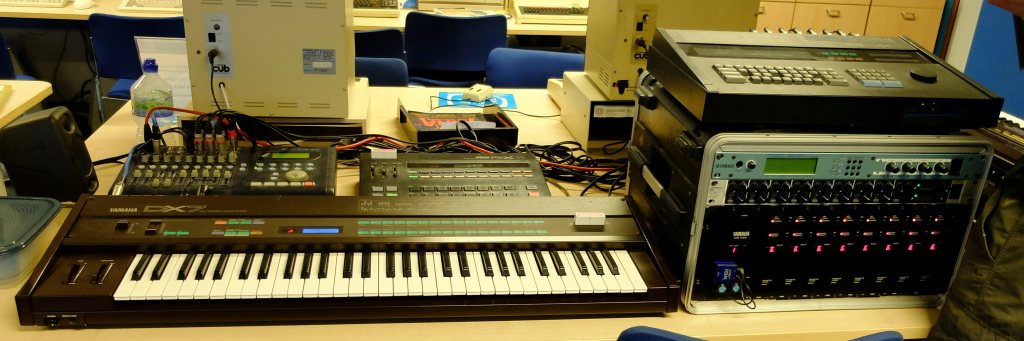
Early inspiration: a week after I first got MiniDexed running on a spare Pi2, I had my first ever physical contact with a real Yamaha DX7: Rob Puricelli‘s DX7 (and TX816) at Synthesized – a two-day festival celebrating the computer and synthesiser at the Centre for Computing History in Cambridge UK (thanks everybody).
My impressions:
- Voice number 11 E.Piano still sounds gorgeous.
- The DX7’s weighty-but-unweighted keyboard feels gorgeous.
- This module’s user interface is no more awkward than the DX7’s 40-year-old membrane keypad.
The following week while researching where to order my Raspberry Pi Zero, I walked into a local shop and bought one straight over the counter – a nice surprise after years of eBay.
A Raspberry Pi Zero is a bit more expensive than an Arduino Nano, so I took rather more care about anti-static precautions and power supply while building.
It turned out that 300mA was too much for my power supply‘s simple 7805 voltage regulator, so I upgraded that with a pre-built LM2596 DC/DC convertor.

I quite like it when a new module uncovers faults lurking in previous work, part of the development process.
FM sounds are editable, but it’s not as easy as patching a VCO through a fruity filter. Here’s Floyd Steinberg again:
Again, I am grateful to all of the contributors to https://github.com/probonopd/MiniDexed.
